Semesters STEM Mini-Dome Build Guide
Suggestions for breaking the project into 2 terms.
Use the quick links below to jump directly to each section of the Semesters Build Guide.
1st Semester | 3D Printing, Painting, & Assembly
- Teacher Prep: Download the STL files, complete a test print, and organize filament, painting materials, and assembly supplies. Gather servo motors, hinges, LEDs, speakers, Arduino boards, and breadboards. Consider printing larger components ahead of time to keep students engaged and allow sufficient time for assembly.
- Student Objectives: Students will learn the fundamentals of 3D printing, print and paint the Mini-Dome components, and assemble the mechanical and electronic parts in preparation for wiring and programming.
This section contains all the information necessary to download and print the 3D files necessary to assemble the Mini-Dome. The Mini-Dome can be printed by most 3D printers that have a build plate size of 10 inches by 10 inches. You can download the parts listed by clicking the button below:
Print Settings: 2 shells, 15% infill, and no supports needed unless noted.
V1 – The V1 is the original Mini-Dome that this guide references. I recommend this model for anyone starting the project for the first time, especially my elementary or middle school students. Excluding the dome, the minimum assembly pieces to print for the V1 include:
- 2x Hinge Base.stl (supports needed)
- 2x Hinge Lift Leg.stl
- 2x Hinge Plate.stl
- 2x Pie Plate.stl
V2 – The V2 is just like the V1 except all panels and parts are separate, allowing students to have more freedom to do things their way. I recommend this model for advanced students who want to move more panels and parts to open or change. Excluding the dome, the minimum assembly pieces to print for the V2 include:
- 3x HoloProjectorLED.3mf
- 2x Hinge Base.stl (supports needed)
- 2x Hinge Lift Leg.stl
- 2x Hinge Plate.stl
- 5x Pie Plate.stl
- 1 each of Panel 2,3,4,5,6,7,8,9,15,16.stl
Bambu A1 FAQs
Loading & Unloading Filament:
Loading Filament:
- On the home screen, tap "Filament" then → "Load".
- Cut the end of your filament at a clean angle, roughly 45-degrees.
- Insert it into the extruder, through the plastic lead tube, until you feel resistance.
- Once you start the print, the Bambu A1 will automatically heat the nozzle then pull the filament through.
- Wait until you see a steady flow of filament from the nozzle, then tap "Confirm".
Unloading Filament:
- On the home screen, tap "Filament" then → "Unload".
- The printer will heat the nozzle to release the filament.
- When prompted, gently pull the filament out of the extruder.
- Once the filament is out of the lead tube, coil it neatly.
Tip! If the filament breaks in the tube or won't unload:
- Extrude the remaining filament that broke off.
- If it doesn't feed through, run the "Unclog" function.
Filament Handling:
Filament Requirements:
Before use, make sure your filament is:
- PLA Basic
- 1.75 mm in diameter
Storage Suggestions:
- Always keep filament sealed when not in use.
- Use resealable bags and desiccant packs that come with rolls.
- Store filament in a cool, dry place. Moisture in the air can cause bubbles, string, or weak bonding.
Handling Tips:
- Avoid bending or kinking filament when loading.
- Cut the filament at a sharp 45-degree angle before inserting it.
- Never pull on the filament that's still inside the extruder.
Signs of Bad or Moist Filament:
- Stringy or fuzzy print.
- Uneven or brittle filament.
- Popping or sizzling during print.
Print Quality Troubleshooting:
Prints Not Sticking to the Plate:
Common Causes:
- Dust or oil build up on the print plate.
- Plate not level after being moved.
- Starting layer too far from the plate.
Fixes:
- Wipe the plate gently with isopropyl alcohol.
- Re-run "Auto Calibration" if the printer has been moved.
- Add a brim in Bambu Studio to help with adhesion.
Stringy Thin Hairs Between Parts:
Common Causes:
- Filament absorbed moisture.
- Nozzle temp is too high.
Fixes:
- Lower nozzle temp by 5-10 degrees Celsius in the slicer.
- Ensure the filament type in print settings is "PLA Basic".
Under-Extrusion (Gaps or Weak Layers):
Common Causes:
- Filament not feeding smoothly.
- Nozzle partially clogged.
- Filament spool tangled.
Fixes:
- Check the filament path for any snags.
- Run "Unclog" or "Nozzle Cleaning" options.
- Make sure the filament can move freely on the spool.
Layer shifting:
Common Causes:
- Printer bumped during printing.
- Loose belt or rail obstruction.
- Unstable table placement.
- Printing too fast for fine detail objects.
Fixes:
- Make sure outside objects stay clear during print.
- Check rails for flakes of filament or debris.
- Ensure that the printer is being used on a solid, sturdy table.
- Slow down the print speed in the printing menu.
Maintenance & Cleaning:
Cleaning the Build Plate:
- Let the plate cool before touching it.
- Remove leftover filament by gently flexing and scraping the plate.
- Tip! Only if needed, wipe the plate with a lint-free cloth and isopropyl alcohol.
- Tip! Avoid using metal tools to scrape the plate.
Cleaning the Nozzle:
- To clean:
- Heat the nozzle to 200-degrees Celsius.
- Use tweezers or a soft brush to remove melted residue.
- If material is deeply stuck, run the "Unclog" or "Nozzle Cleaning" function.
- Tip! Never touch the nozzle with fingers, it is hot!
- Tip! Do not poke inside the nozzle, this can damage the print head.
General Upkeep:
- Keep the printer in a dust-free, stable environment.
- Avoid drafts, keep the printer away from windows or vents.
- Power the printer down when not in use for long periods.
Painting Instructions:
Painting Instructions
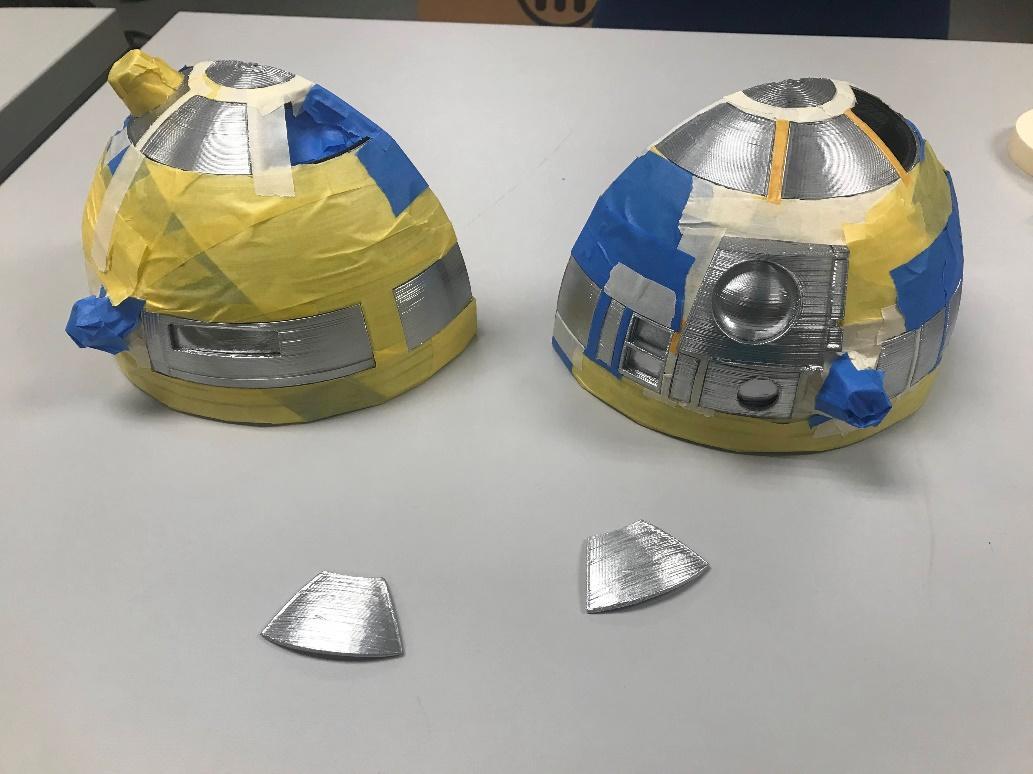 In this step, I will outline how I recommend painting the mini-dome. It would be great if you first sanded all the parts, so no lines are showing on the model. I would recommend 220 grit sandpaper and working down to steel wool. Once you have sanded the parts and cleaned the parts of any debris, it is now time for a paint filler. I would recommend any primer paint spray can that is also a paint filler. You can pick these up at Lowes or Home Depot. If you can not find these rattle paint spray cans, any primer that will bond to plastic will work.
Once you have the primer applied, let it sit for one day. Now it is time to add your first base coat, and I would recommend a silver. That way, you get that nice dome silver look. You can use any spray can that bonds to plastic and has the shine you are looking for. Let that sit for at least a day. Once it is no longer tacky, use painter/detail tape to tape off sections you want to keep looking silver.
You will now paint the other parts with a color of your choosing. I would recommend blue, because, well, R2-D2 is blue, of course, . The critical part here is to not paint directly on the model. Just apply dusting coats back and forth. When you push down on the nozzle, make sure you have pointed away from the model and then swipe across the model with a side-to-side motion, not leaving the can in any one place for a long period of time. The painter's tape will not keep paint from running if you apply too much.
Assembly:
This section provides step-by-step instructions for installing servo motors and hinges, attaching LED lights and a speaker, connecting the dome sections, and securing the breadboard and Arduino in preparation for wiring and programming.
- Teacher Prep: Organize 3D-printed parts, servo motors, hinges, LEDs, speakers, Arduino boards, breadboards, and assembly supplies. Review the assembly instructions and prepare materials for each step.
- Student Objectives: Students will assemble the Mini-Dome by installing mechanical and electronic components, connecting 3D-printed sections, and preparing the structure for wiring and programming.
Assembly Instructions
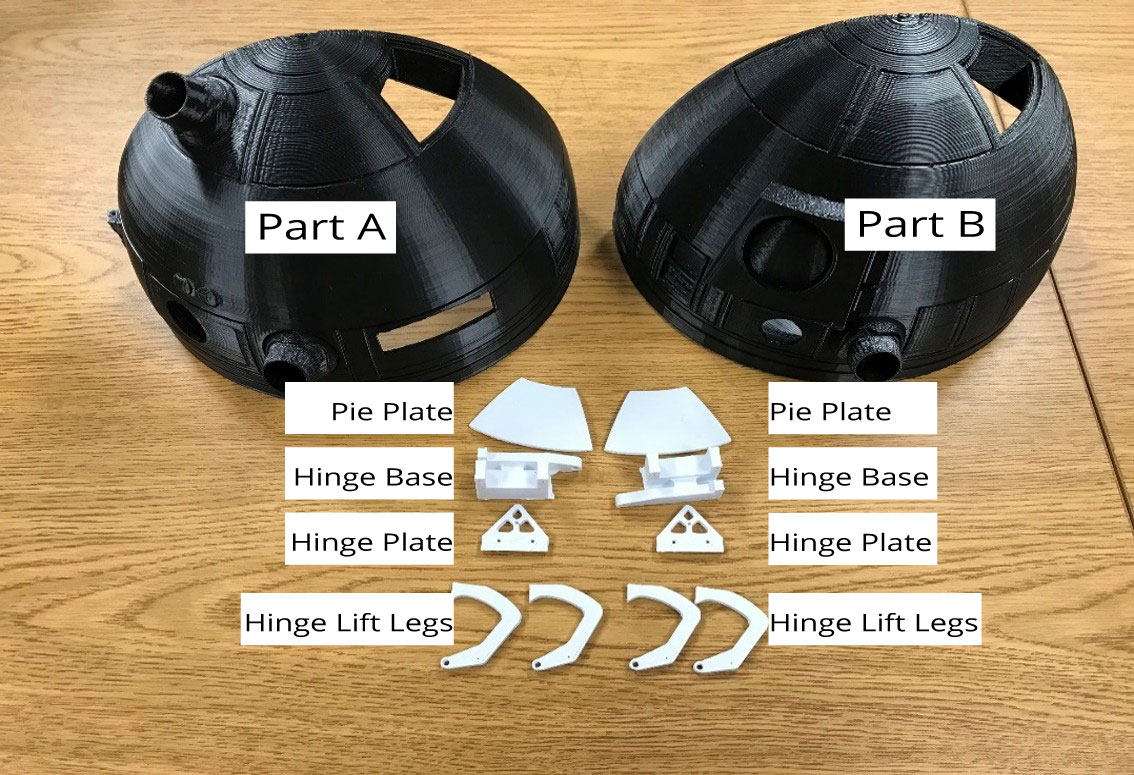 This section will guide you through the process of assembling all the 3D-printed parts and supplies necessary to make everything work. The mini-dome assembly is broken down into multiple steps with pictures to assist in the construction of the dome. Below is a picture of all printed parts needed for the assembly.
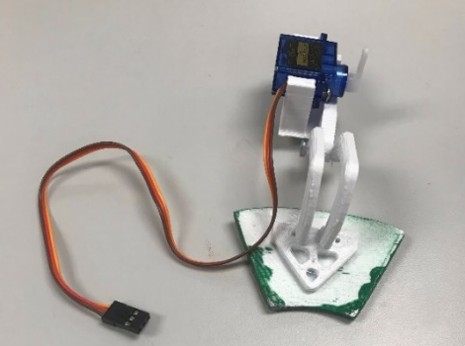
Step A - Servo Motor & Hinges
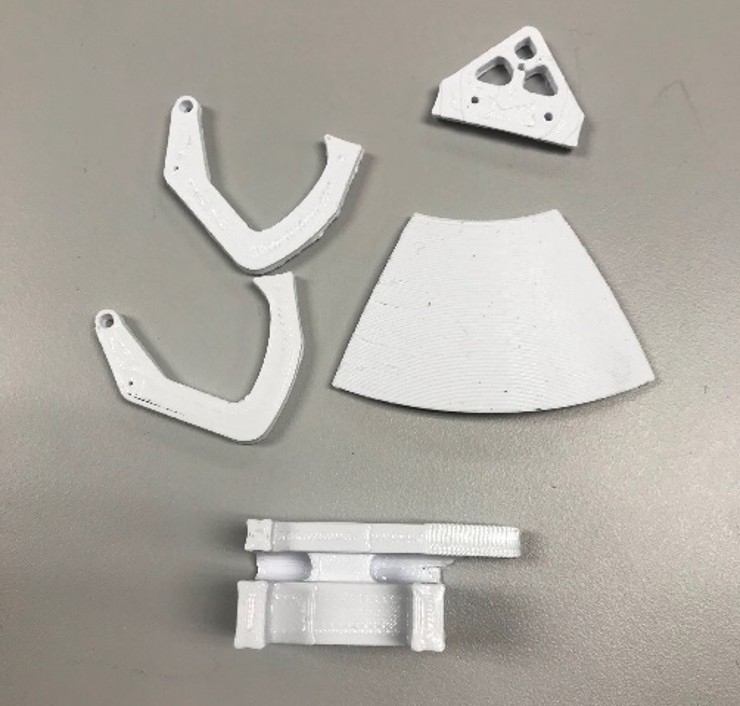 V2 Note: A typical dome has two hinge assemblies, though the V2 can have up to five moving pie plates. If you decide a pie plate won't be moving, just glue the pie plate to the empty hole in the dome.
- Connect 2 legs to the base using an m3 nut and bolt from the parts list.
- Drill out a small hole on each leg with a 1/16th drill bit for the paperclip pull arm to be used later.
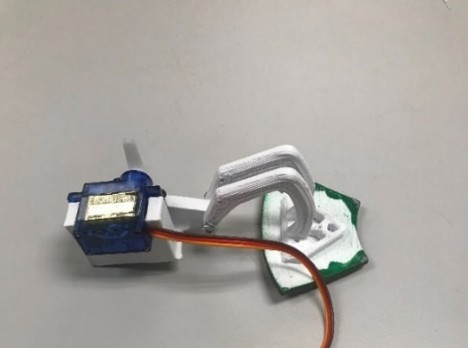
- Secure the SG90 servo motor to hinge base with two pointed screws in the bag that came with the SG90 servo motor.
- Glue both legs onto the hinge plate.
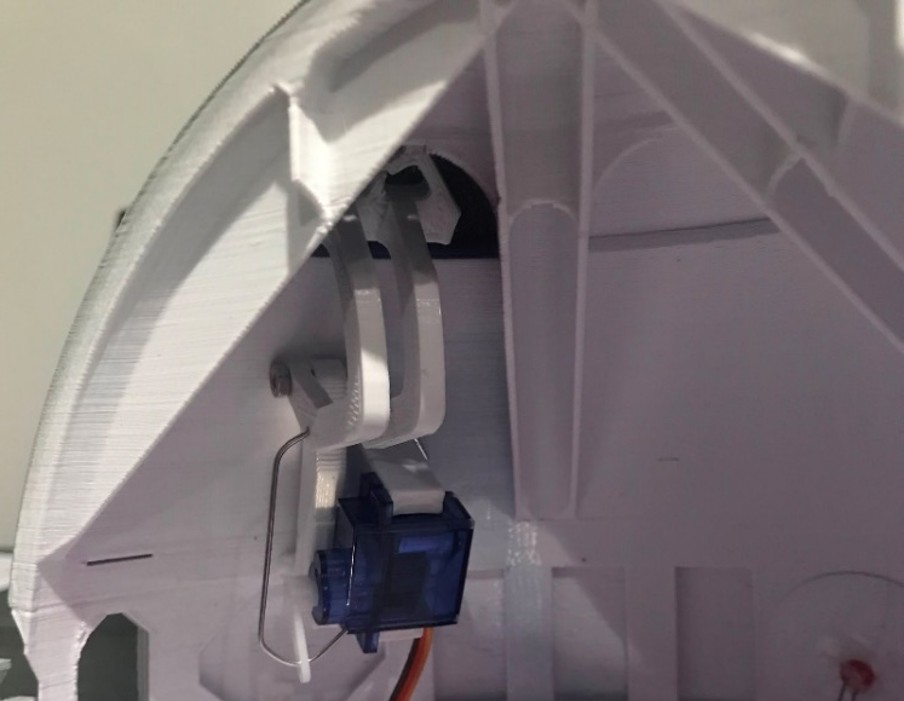
- Glue the hinge base onto the inside of the dome.
- Alignment is critical here, you need to make sure that the mechanism moves through the pie plate opening and is centered. Once this is centered tape and glue the hinge base inside the dome.
- Glue hinge plate to backside of pie plate.
- This step can be a bit tricky on alignment. You must tape the pie plate into the dome prior to gluing. Then glue the hinge plate to the pie plate. This will give exact alignment for the mechanism.
- Secure all pieces with tape as needed and let dry.
- After the glue dries, make sure a full range of motion is available.
- Take a single small wing that comes with the servo motor and place it on the motor.
- Ensure a range of motion if the pie plate catches on outside dome sand until the pie place fits and freely moves on hinges.
- Attaching paperclip, take a paper clip and make two 90-degree angles facing the same direction.
- Place one end into the drilled-out holes of the leg and the servo wing hole simultaneously. The servo wing hole may need drilled out, I used the last hole in the servo wing but the next to last hole will work fine as well.
- Bend the paper clip to secure it to the legs and servo wing.
Step B - LED Lights
V2 Note: You'll need to first hot glue the HoloProjectorLED housing in place, in any direction you would like!
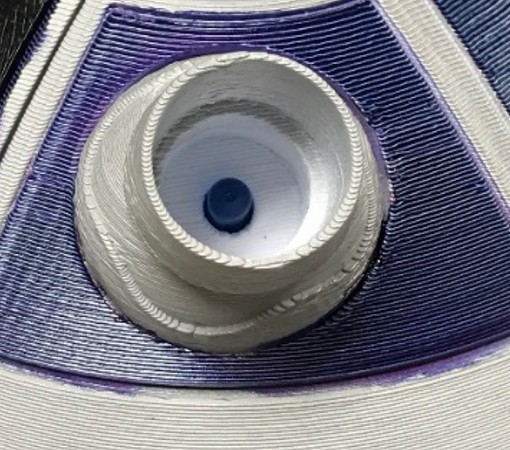
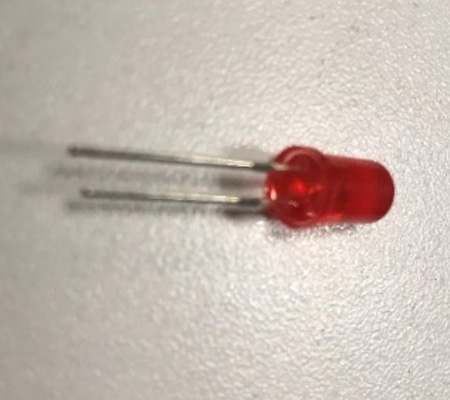
- Select 3 LEDs two post lights for the three holo-projects on the dome. You can use any color LED you want.
- Using hot glue, glue the selected LED lights into holo-projector holes. Depending on how you connect the LED wires, you may need some hot glue to keep the wires from slipping.
Step C - Speaker
- Use a 1W 8 ohm round speaker.
- Using hot glue, glue the speaker into the round hole near the hinge.
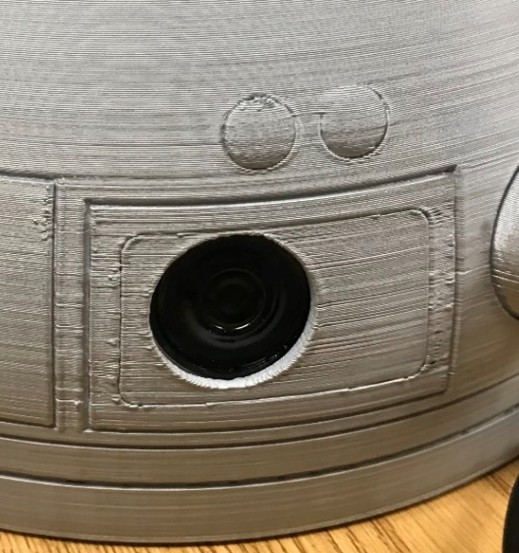
Step D - Connect Domes
- Connect the V44 Part A and B so that both hinges line up.
- Use a piece of PLA filament (1.75mm) that is 26 mm long and push it through the holes in the hinge.
- You can use a soldering iron and heat the top part of the filament to bond it to the hinge on Part B.
- Using two rare earth magnets 6mm X 3mm
- Glue one magnets on Part B with super glue. Make sure you mark which side is positive and which side is negative.
- Glue the other magnet to Part A with super glue and ensure they make a solid connection
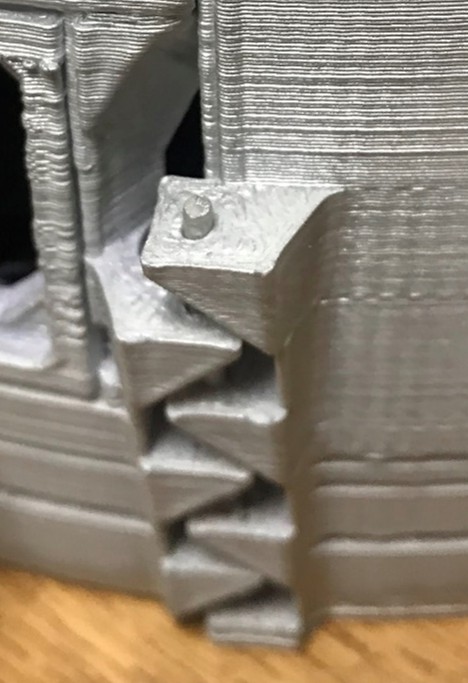
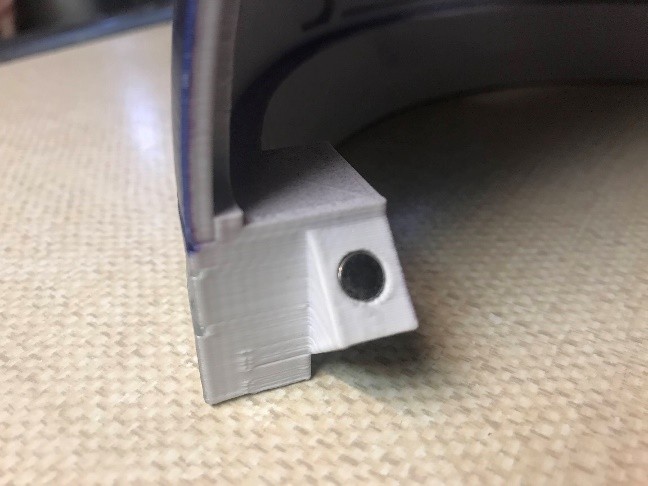
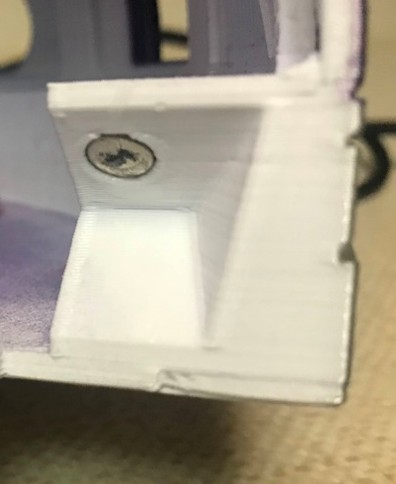
Step E - Breadboard and Arduino
- Using Hot Glue, glue the breadboard and Arduino on the large plate on Part A.
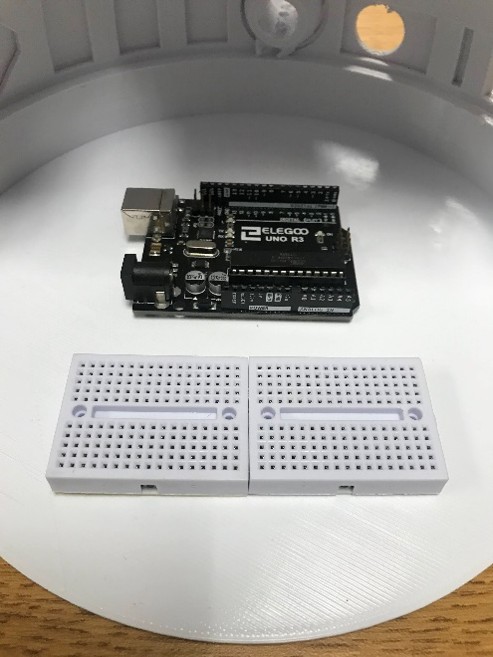
CONGRATULATIONS, now time to do some wiring!
Need a little extra help wrapping your head around a concept, or just have a few questions? I'd love to connect! Schedule a time to chat, or if it helps, I'm always happy to drop by during your class time to support you and your students.



2nd Semester | Wiring, SD Card, & Coding
During the second semester, students will complete the wiring and programming of their Mini-Dome. Using step-by-step wiring diagrams and instructional resources, students will connect LED lights, servo motors, an MP3 player, an amplifier, and a remote control to the Arduino. They will also prepare SD cards for audio playback and use OCSBotBlocks to program and customize the dome's lights, movements, and sounds.
- Teacher Prep: Gather wiring supplies, LEDs, servo motors, MP3 players, amplifiers, speakers, buttons, and jumper wires. Prepare microSD cards and audio files, review the wiring diagrams, and familiarize yourself with the OCSBotBlocks coding lessons. Allow time for students to test their connections, troubleshoot problems, and experiment with custom programming.
- Student Objectives: Students will connect and test the Mini-Dome's electronic components, prepare SD cards for audio playback, and use OCSBotBlocks to program lights, motors, sounds, and remote-control functions. Students will also experiment with coding to create unique movements, lighting sequences, and sound effects.
Wiring Instructions
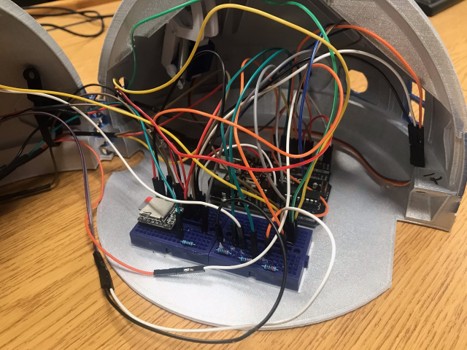
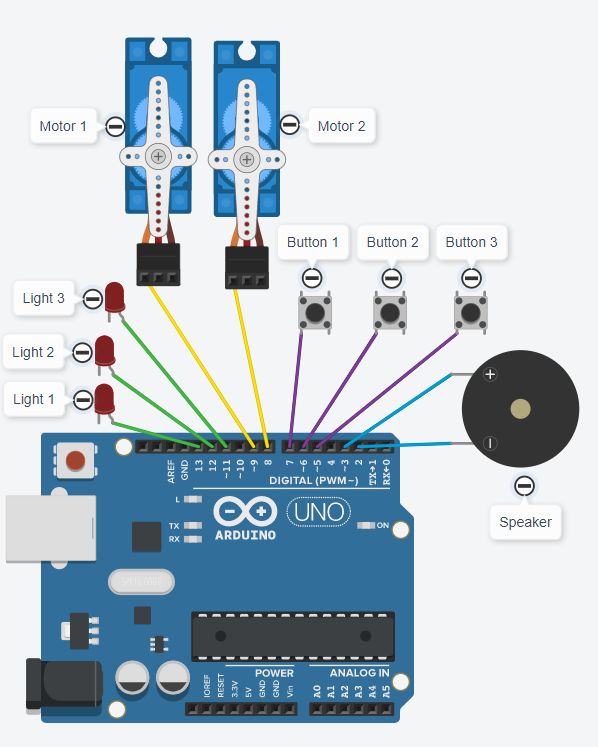
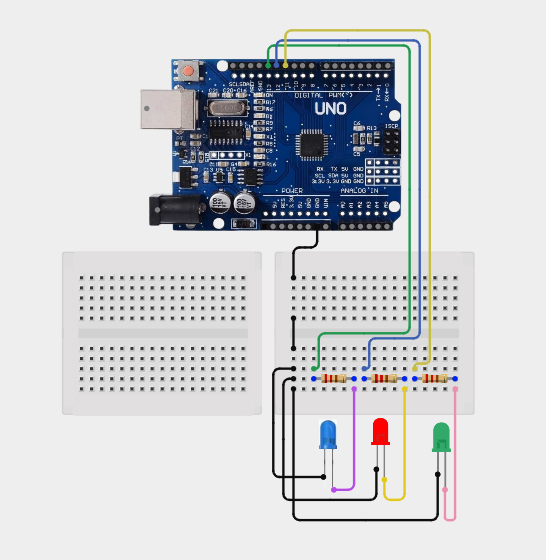
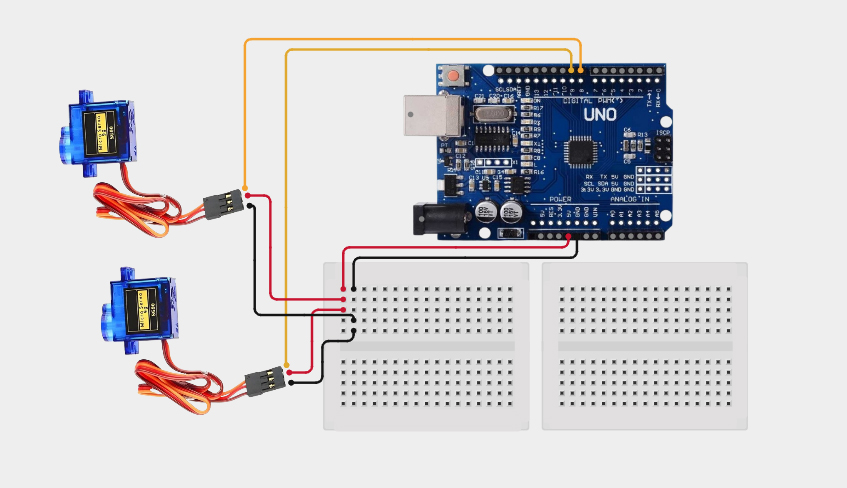
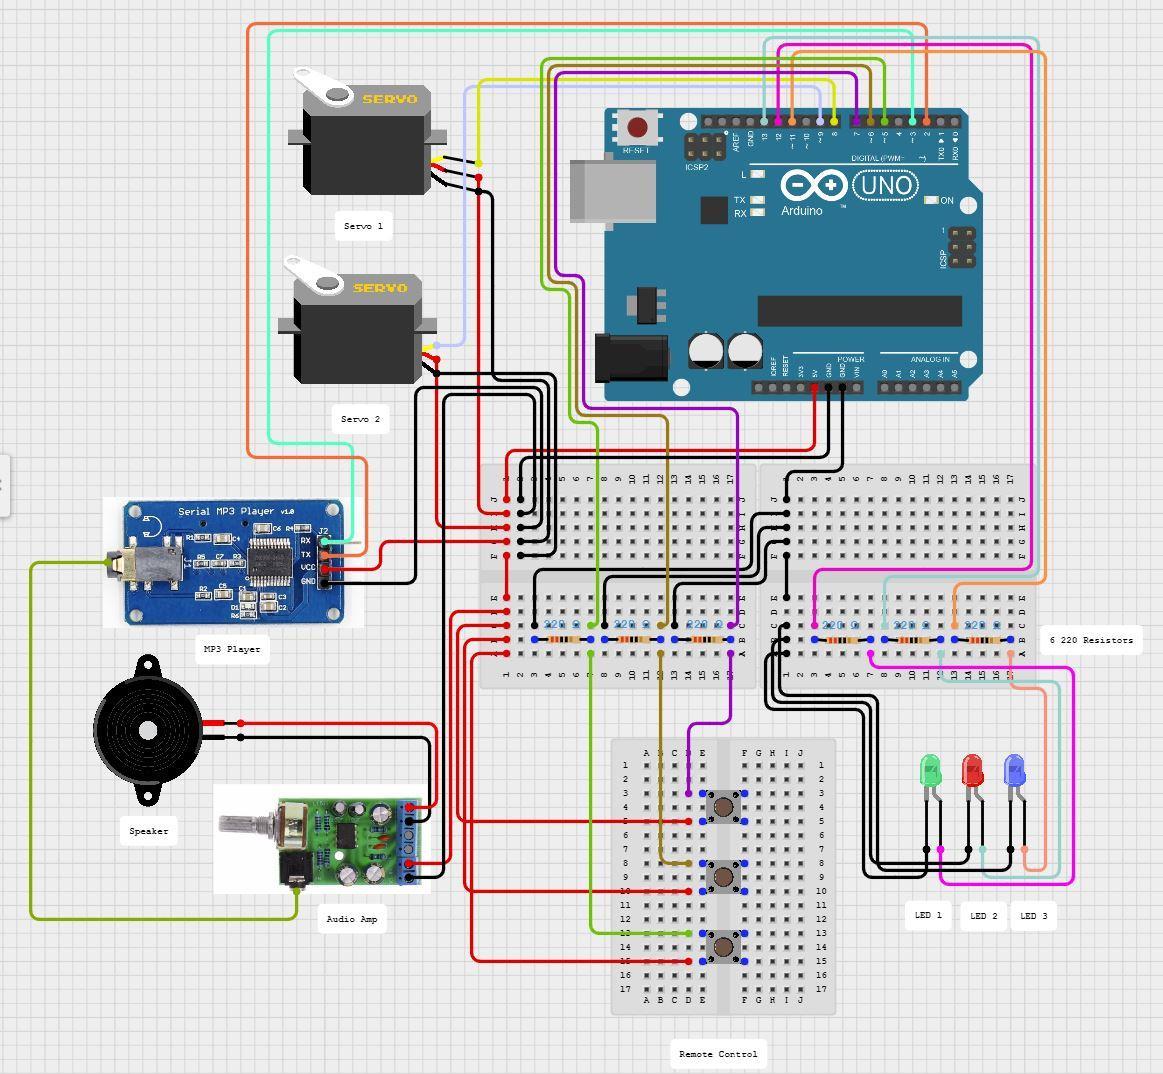
This section contains the information necessary to wire up the mini-dome. This process can be done in many different ways. The main goal is to get 3 LEDs, 1 MP3 module, 2 servos and one remote control wired up to the Arduino. You will use the jumper wires to connect everything.
If you are wiring up just the LEDs first, this diagram can be helpful. It is just the LEDs with nothing else on it. That is a good first step into the wiring process.
If you are wiring up just the Motors, this diagram can be helpful. It is just the Motors with nothing else on it.
If you are wiring up just the MP3 & AMP, this diagram can be helpful. It is just the MP3 & AMP with nothing else on it.
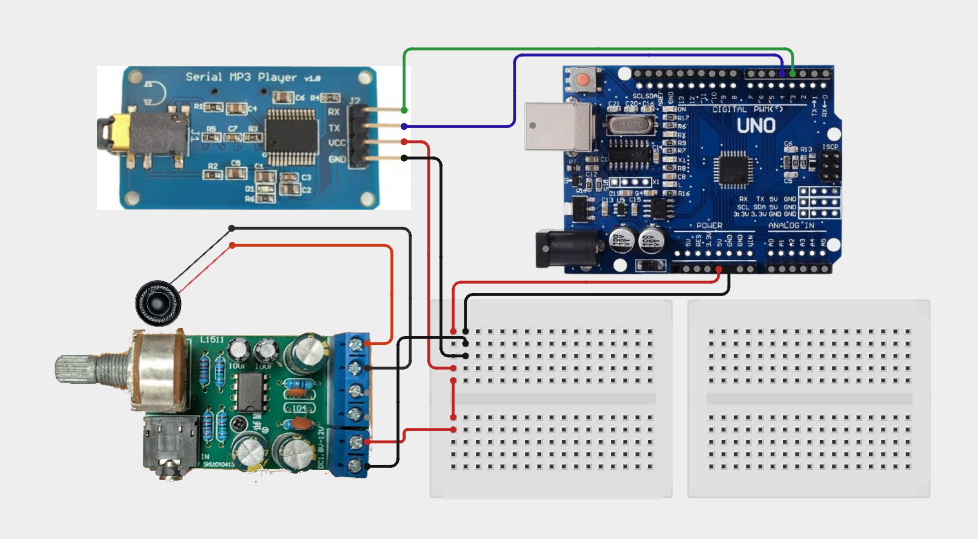
Overall diagram.
SD Card Instructions
This section contains all the information necessary to upload MP3 files to your SD card that you will use in the audio player. The audio files that I used for the mini-dome are located in the link below.
Connect the MP3 player, speaker, and amplifier board to the Arduino using the wiring guide below.
- Insert SD card into laptop, Right click the SDHC (menu on left) and format it using FAT32
- The SDHC can be found in drive "D" using the File Explorer
- Download the sound file to the computer's hard drive
- Rename the sound file:
- Found in the "Downloads" folder via File Explorer
- Right click the file and select "Rename."
- Name each file using the following format: xxx001.mp3, xxx002.mp3, xxx003.mp3, etc.
- Go back to File Explorer and Right click the SDHC card found in the menu on the left. Select "New" and then "Folder." Create a new folder named "01"
- Select "Downloads" (again in the menu on the left) and drag the newly named sound file into Folder 01 under SDHC in the menu on the left.
- Double check that the 01 folder in the SD card now contains the sound file (xxx001.mp3)
- Right click the SDHC in the menu and safely "Eject" the card. You MUST do this every time you remove the card from the port.
- Insert the SD card into the MP3 player with the copper connectors facing the Printed Circuit Board until you feel it click.
- MP3 power must be disconnected when inserting or removing the card.
- The sound file is now installed and is ready to test.
Coding
This section allows your students time to get creative and add some variation to their project by differentiating their code.
Coding Instructions (OCSBotBlocks)
Instead of using the Arduino IDE the domes can be coded using a block coding language. A few changes will have to be made to the dome to make all the lessons below work. The first is that you will need to use a different MP3 player that is noted on the Parts and Supply page. I recommend this alternative for middle school and younger students.
First, let's understand a few basic concepts. We will be using a computer inside the Dome called an Arduino that connects all of the electronic components and uses the coding language of C++ however in this challenge we will be using a program called OCSBotBlocks to make our domes operate. We will drag blocks of code from the menu and snap them into our Setup and/or Loop blocks and then upload our code to the dome to watch what happens.
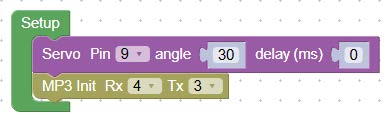
Setup
Every Arduino program must have a setup function. A function is a block of code that controls the computer and performs computations. The code we drag into the setup function runs upon the start of the computer and runs only once. In this function we will, define the following too be the end of the challenge.
Servo starting functions:

Sound controls:
Loop
Every Arduino program must also have a loop function. This is the main function and as it's name hints, it runs in a loop over and over again. The code we place at the top of the loop runs first and works to the bottom and then repeats at the top again. The loop is commonly referred to as the main logic of yoru circuit. In this function we will define the following by the end of the challenge.

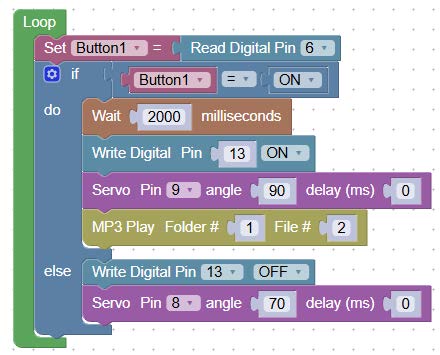 Button variables:
Logic controls:
Time functions:
Light functions:
Servo movement:
Sound playing:
Sound controls:
Lesson #1 - Lights
By the end of this lesson, you will learn how to blink the lights inside the STEM Mini-Dome. We will be working with 2 new function of coding.
 Write Digital Pin is a function which allows us to send voltage to the lights. We first set the pin number to be the number on the Arduino that the light is plugged into. You can use the Visual Diagram to see what numbers each device is plugged into. Then you decide to turn it on by selecting ON or turn it off by selecting OFF.
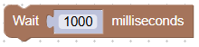 Wait is a function which allows us to put a pause in the program for the amount of time (in milliseconds) we want the code to stop for. For example, 1000 milliseconds is 1 second.
Steps to Code 1 Light
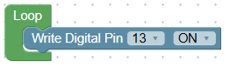 #1 We are dragging over the Write Digital Pin function from inside
 menu to the left of our working screen and snap it inside our Loop as shown to the right. Change the values inside this function, the digital pin number should be set to pin 13 and make sure it is set to ON and not OFF.
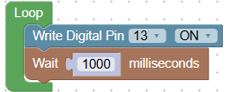 #2 Find and drag the Wait function from inside the
 menu and snap it as shown to the right below the Write Digital Pin function.
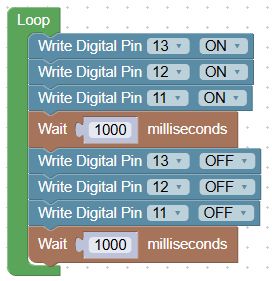
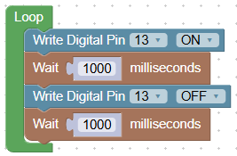 #3 Repeat steps #1 and #2 until you have built a set of code that looks like the example below. The only change you will make is to ensure the second Write Digital Pin 13 will be set to OFF.
#4 You can now upload your clicking  to the top right of your screen. Do you see a light blinking ON and OFF??? CONGRATULATIONS, you are off to a good start!
Independent Challenge #1
Now that you know how to blink 1 light, can you figure out how to blink the remaining 2 lights? Hint, check your visual diagram so you know what Pins the other 2 lights are connected to. If you are not sure how to complete this task and you need further assistance you can refer to the full code example below.
Question #1: What caused the lights to be slower?
Once you have all 3 lights blinking you can move on to Lesson Number 2.
Full Code for Independent Challenge #1:
Lesson # 2 - Motors
By the end of this lesson, you will learn how to move the STEM Mini-Dome pie panels by using the motors that are connected. We will be working with 1 new function of coding.
The Servo function allows us to move the motor to a degree angle. We first set the pin number to be the number on the Arduino that the servo is plugged into. You can use the Visual Diagram to see what numbers each device is plugged into. Then you decide what angle you want to move the motor, this range is normally between 90 degrees (pie panel closed) and 20 degrees (pie panel fully open) for the domes.

Steps to Code 1 Motor
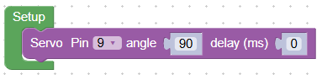 #1 Drag the Servo function from inside
 menu to the left of our working screen and snap it inside Setup as shown to the right. Change the value for the Angle to 90 degrees..
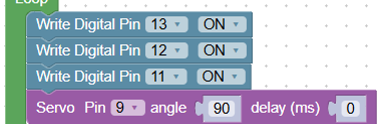 #2 Find and drag the Servo function from inside the menu and snap it below the Write Digital Pin function and above the Wait function.
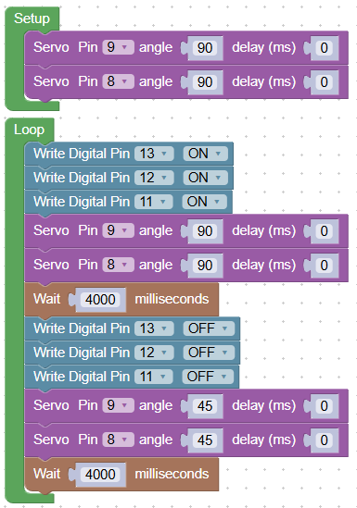
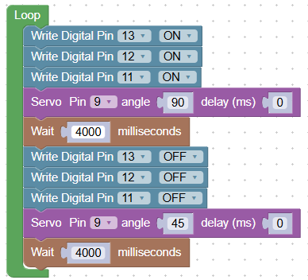 #3 Find and drag the Servo function from inside the menu and snap it below the Write Digital Pin functions that are set to off and above the last Wait function. You will also want to change the Wait function time from 1000 milliseconds to 4000 milliseconds to give your motors enough time to move.
#4 You can now upload your clicking  to the top right of your screen. Do you see one motor moving UP and DOWN??? CONGRATULATIONS, BUILDER!!!
Independent Challenge #2
Now that you know how to move 1 motor, can you figure out how to move the other motor? Hint, check your visual diagram so you know what pin the other motor is connected to. If you are not sure how to complete this task and you need further assistance you can refer to the full code example below.
Question #2: What caused the motors to stop at a certain point?
Once you have all 3 lights blinking and 2 motors moving you can move on to Lesson Number 3.
Full Code for Independent Challenge #2:
Lesson #3 - Sounds
By the end of this exercise, you will know how to play sounds through the STEM Mini-Dome by using the MP3 Players through the speaker. We will be working with 3 new functions of coding from the YX5300 Library. The YX5300 is the name of the type of MP3 hardware we are using to play sounds through our domes.
 The Mp3_player connect function allows us to choose the pins we will use to transmit (Tx) and receive (Rx) sound files.
 The Mp3_player play function allows us play different sound files by choosing the number on the SD card.
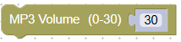 The Mp3_player volume function allows us to adjust how loud the speaker will be.
Steps to Code 1 Sound
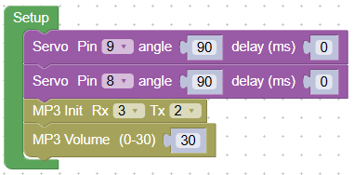 #1 Drag the Mp3_player connect function and the Mp3_player volume from inside the
 menu to the left of our working screen and snap it inside our Setup as shown below. Change the values inside Mp3_player connection function, to Rx 3 (Receive) and Tx 2 (Transmit). Change the values inside the Mp3_player volume function to 30 to make it as loud as possible!
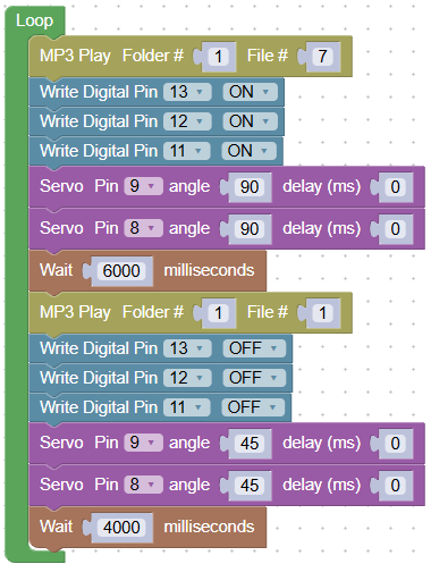
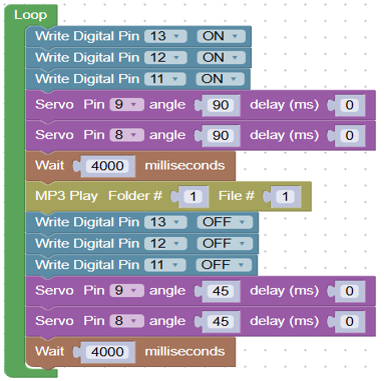 #2 Drag the Mp3_player play function from inside the menu to the left of our working screen and snap it inside our Loop as shown to the side and below our first wait function. Keep the folder # 1 and file #1.
#3 You can now upload by clicking  to the top right of your screen. Do you hear some beeps and bops??? CONGRATULATIONS, you are well on your way to becoming a MASTER BUILDER!!!
Independent Challenge #3
Now that you have 1 sound going, can you figure out how to make more sounds happen? Hint, the domes have 7 different files from #1 to #7, but 1 folder, just use the 1st folder. If you are not sure how to complete this task and you need further assistance you can refer to the full code example below.
Question #3: How do you play different audio files?
Once you have all 3 lights blinking, 2 motors moving and can play multiple sounds you can move on to Lesson Number 4.
Full Code for Independent Challenge #3:
Lesson #4 - Remote Control
By the end of this lesson, you will know how to control the mini dome operations using buttons on a controller. We will be working with some new terms in this lesson.
 The if do else structure checks for a condition and executes a set of commands if true. If the condition is true, it will run the function in the do section, if the condition is false it will complete the function in the else section. We will also be using operators like " =, +, or, - ", they are mostly used for logical or mathematical calculations.
 The Button variable is a text we define to call functions, this variable is a Boolean data type which just means this is a data type that is either true or false. We will also be using operators here
Steps to Code 1 Button
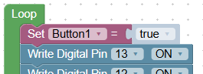 #1 Drag the the first Button variable from inside the
 menu to the left of our working screen and snap it inside our Loop at the very top as shown to the side. Make sure to change the value for the Button 3 to Button 1.
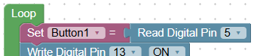 #2 Drag the Read Digital Pin function from inside the
 menu to the left of our working screen and snap it inside our Loop as shown to the side. Change the pin value for Read Digital Pin to 5. We also need to make sure to change the value for the Button 3 to Button 1.
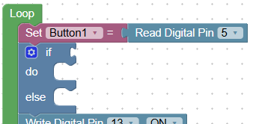 #3 Drag the If do else structure from inside the
 menu to the left of our working screen and snap it inside our Loop as shown to the side.
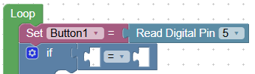 #4 Drag the = operator from inside the menu to the left of our working screen and snap it inside our Loop on the if line as shown to the side.
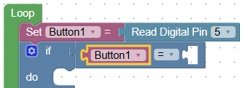 #5 Drag the the second Button variable from inside the menu to the left of our working screen and snap it inside our Loop to the very top as shown to the side in front of the = operator. Make sure to change the value for the Button 3 to Button 1.
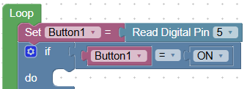 #6 Drag the ON operator from inside the menu to the left of our working screen and snap it inside our Loop as shown to the side to the right of the = operator.
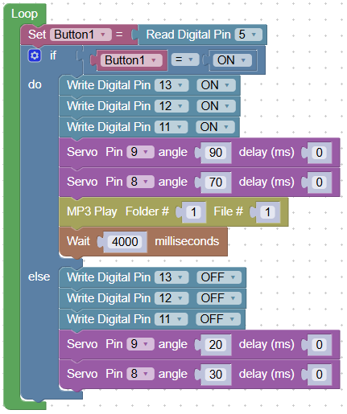 #7 Drag the Write Digital Pin 13 functions that are set to On, that is under the if do else structure and move it to the inside of the do section.
#8 Drag the Write Digital Pin 13 functions that are set to Off that is in the do section and move that to the else section.
#9 You can now upload by clicking to the top right of your screen. Try your button you just coded, does all the operations work as intended???
CONGRATULATIONS, you are a MASTER BUILDER!!!
Independent Challenge #4
Now that you have 1 button working, can you figure out how to make the other 2 buttons perform different operations? Can you make each button have a different set of motions, lights and sounds? Be creative and have fun you have completed the challenge!
Question #4: What caused the lights to blink, motors to move and sound to play when you pressed a button?
Once you have all 3 lights blinking, 2 motors moving and can play multiple sounds you can move on to Lesson Number 4.
Full Code for Independent Challenge #4:
This is just an example and you can do anything you want!
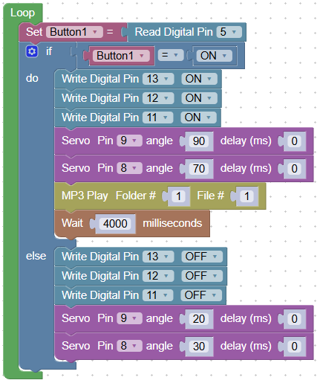
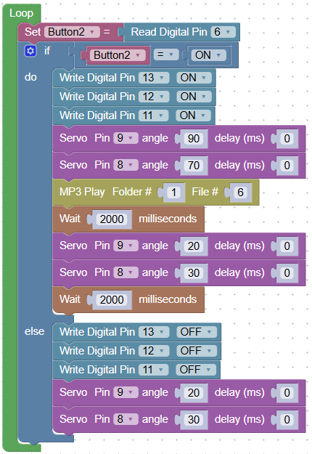
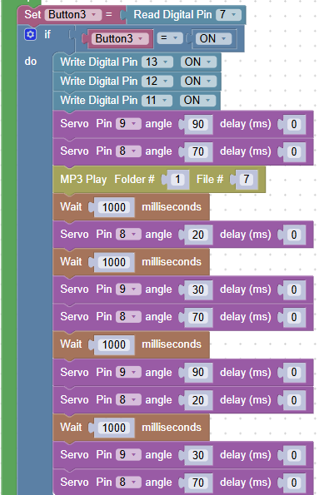
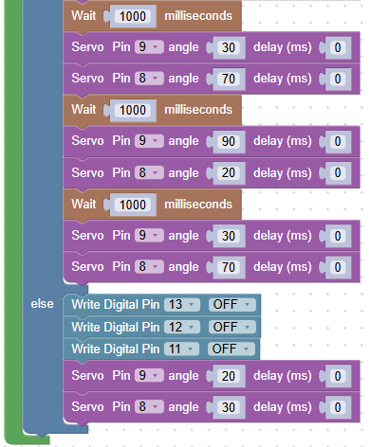
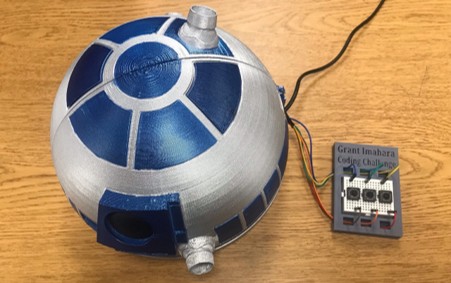
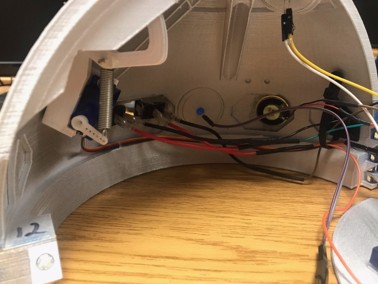
You are now DONE! I hope you had fun building your mini-dome. Now time to do some coding!!! I will include a few reference pictures below in case they are needed. Contact me if you have any questions.
What's Next After OCS
Hillsboro Campus (Central Campus)
Located in Highland County, Southern State's Hillsboro Campus serves as an accessible hub for hands-on learning, career technical training, and university transfer programs tailored to local workforce needs. Students benefit from small class sizes, state-of-the-art facilities, and personalized support services that make pursuing an associate degree or certificate both manageable and affordable. Whether you are stepping onto a college campus for the first time or returning to advance your career, Hillsboro offers a welcoming community focused on your personal and professional growth. Discover flexible pathway options, connect with dedicated faculty, and start building your future right in the heart of Highland County.
Manufacturing
Manufacture success! Southern State's Engineering Technology degree provides you with the tools to prepare specifications for materials, test for quality control, study ways to improve manufacturing efficiency, supervise production workers, work as field representatives, install and repair technical equipment or write repair and operation manuals.
Want to learn more about manufacturing? Visit:
Map your next move. Schedule a virtual or in person 1-on-1 Q&A with an Advisor to discover the exact support you need to reach your goals.
Brown County Campus
Southern State Community College's Brown County Campus delivers high-quality higher education and workforce development directly to the local community, keeping college close to home. Designed with convenience and accessibility in mind, the campus provides modern classrooms, supportive staff, and essential degree and certificate pathways designed to jumpstart your career. Students enjoy a tight-knit learning environment where individualized attention ensures you never feel like just a number in a crowd. It's the ideal home base for area residents looking to gain valuable skills, save on tuition, and seamlessly transfer to four-year universities.
Online Courses
Southern State's flexible online courses bring quality higher education straight to your screen, allowing you to earn your degree or certificate on a schedule that fits your busy life. Perfect for working professionals, parents, and self-motivated learners, online learning provides 24/7 access to course materials, interactive discussions, and dedicated instructor support from anywhere. You get the same rigorous curriculum, affordable tuition rates, and accredited credentials as on-campus programs without the daily commute. Take control of your educational journey and balance work, family, and studies on your own terms.
Associate of Arts
Creative juices flowing? Did you know Southern State offers an Associate of Arts degree? Continue your education with a personalized degree plan to include Fine Art, Film, and Theatre.
Want to learn more about an Associate of Arts degree? Visit:
Map your next move. Schedule a virtual or in person 1-on-1 Q&A with an Advisor to discover the exact support you need to reach your goals.
Early Childhood Education
Turn your passion for helping young children into a meaningful career with an online Early Childhood Education degree. After completing Ohio Code Scholar, continue building your skills to inspire confidence in young students and make a lasting difference. Take the next step today to become the educator you are meant to be.
Want to learn more about an Early Childhood Education degree? Visit:
Map your next move. Schedule a virtual or in person 1-on-1 Q&A with an Advisor to discover the exact support you need to reach your goals.
Visual Reference Guides